I’ve been backing up some of my larger files to Bluray lately, instead of trying to upload them over a 10 Mbps uplink.
In the past, I used GPG (on a .tar or compressed .tar.xz) or Veracrypt (on a file container) to encrypt at rest, before burning those files onto a standard UDF/ISO9660 optical disc. Now that I use a Linux desktop, I wanted something slightly more native — a method that
protects the directory structure and filenames without needing to use an archive file (like .tar);
would be generally unintelligible on a Windows PC (this is a feature, not a bug); and
could be scripted on the command line for server backups, without requiring a GUI.
Based on some resources online, I settled on using LUKS.
For a long time, I’ve been using kickstart scripts (link to GitHub repo) to set up Fedora and CentOS virtual machines on a XenServer host. In the last year or so, the trend of cloud computing has led distributions to release prebuilt “cloud” images in OpenStack-compatible qcow2 or raw disk format, which happen to be broadly compatible with hypervisors. Fedora Cloud’s introduction with F21 prompted me to look into ways of using cloud-init/cloud-config without an entire private cloud infrastructure.
It should no longer be necessary to use a kickstart to install a new VM, because the distribution’s prebuilt images easily work on XenServer with a few conversions.
(Kickstart scripts remain useful for customizing an image, of course; they are often the mechanism with which Linux distros build such images.)
What are prebuilt images?
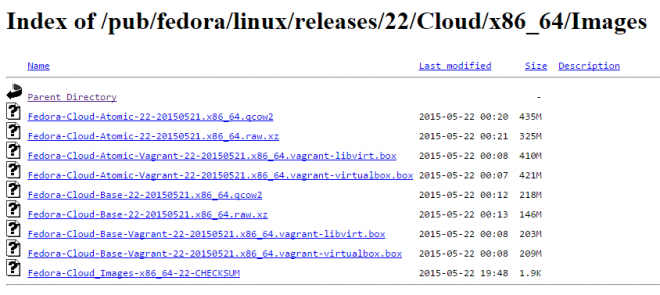
When I say “prebuilt images”, I mean VM hard disk files released by the Linux distribution. For instance, Fedora 22’s Cloud Base and Atomic Host images are provided in qcow2 and xz’d raw files:
These releases are designed to work in actual cloud infrastructure—meaning a compute hypervisor (usually KVM), a metadata service that supplies configuration like hostname and networking at boot time, and some APIs that can programmatically affect the virtual machine’s behaviour and configuration. OpenStack is the leading example.
But OpenStack is overkill when you’re just virtualizing a handful of VMs. You don’t need a private cloud when you’re not running a cluster or spinning up machines programmatically. That’s exactly why I found myself running XenServer.
Nonetheless, unless you’re using Xen full paravirtualization (which there are now good reasons to avoid), these images should broadly work with all major hypervisors: QEMU-KVM, VirtualBox, Xen PVHVM, VMware, etc… with minor format tweaks.
How to convert a prebuilt image for use in XenServer
Broadly, there are three steps in the process, the first of which is most important:
Convert qcow2 disk image to VHD.
Import VHD in XenCenter.
Customize imported machine and convert to template.
You can optionally also export the template to an XVA file.
1. Convert qcow2 to VHD
The qemu-img utility can do this. Use your package manager of choice to install (e.g. yum install qemu-img or dnf install qemu-img on F22+). You should do this on another Linux machine (even a VM is okay), because messing with the Xen dom0 is not recommended.
Locate your downloaded *.qcow2 file, which might look something like Fedora-Cloud-Base-22-20150521.x86_64.qcow2. If it’s compressed, like CentOS-Atomic-Host-7.1.2-GenericCloud.qcow2.xz, decompress it first.
Use the command $ qemu-img convert -f qcow2 -O vpc [input file] [output file] to do the conversion. For example,
If you have XenCenter installed on Windows, use the File -> Import… option to load the VHD. Follow the prompts to set up the VM’s CPU, memory, storage, and networking allocations.
Manual import on command line
Ugh, not using the UI? That means a whole lot more work to import. Are you sure about this???
If you do not have access to XenCenter, it’s a more involved process.
Transfer the newly converted disk image to the hypervisor dom0, such as by copying it into a shared storage location (e.g. NFS image library), and you should be able to use xe vdi-import to load the VHD:
First, get the size of the disk image with $ qemu-img info [VHD file]. Note the size in bytes.
$ qemu-img info Fedora-Cloud-Base-22-20150521.x86_64.vhd
image: Fedora-Cloud-Base-22-20150521.x86_64.vhd
file format: vpc
virtual size: 3.0G (3221471232 bytes)
disk size: 516M
cluster_size: 2097152
Create a VDI in XenServer using the command line tool to hold this new data:
# set SIZE to size in bytes, e.g.
$ SIZE=3221471232
# set SR to the UUID of a storage repository in which to store the VDI
$ SR=$(xe sr-list name-label='NFS virtual disk storage' --minimal)
$ UUID=$(xe vdi-create name-label=Fedora-Cloud-Base-22-20150521.x86_64 virtual-size=$SIZE sr-uuid=$SR type=user)
If all has gone well, you get output to the effect of
[|] ######################################################> (100% ETA 00:00:00)
Total time: 00:00:24
You can check that it’s there by doing
$ xe vdi-list uuid=$UUID
It’s time to make a VM (important: must be PVHVM) to which to attach this VHD. You’ll need to create the CD drive, set up networking, etc, all on the command line. The CD drive should be installed with a cloud-init/cloud-config datasource. (Aren’t you regretting not using the GUI now?)
$ VM=$(xe vm-install new-name-label=Fedora-Cloud-Base-22-20150521 template='Other install media')
# make an optical drive, which you might need for cloud-init
$ xe vm-cd-add cd-name='cloud-init-example.iso' vm=$VM device=3
# get the list of networks and their UUIDs; select one
$ xe network-list
# the following line is an example
$ xe vif-create network-uuid=b4187ad6-916e-d1d4-90a7-2b7f1353bca2 vm-uuid=$VM device=0
Now, create the virtual block device (VBD) that associates the VHD disk image with the VM.
The VM is now ready (although you’ll need to adjust CPU and RAM, which is outside the scope of this guide), either to be booted or to be stored as a template!
3. Customize and convert to template
I like to convert the now-ready VM to a template before using it for anything. This makes it a lot easier to deploy from this point onward. It’s also helpful to tweak the default CPU/memory parameters if desired.
When it’s ready, you can select a halted VM, and choose VM -> Convert to Template… in XenCenter. The equivalent for the xe CLI is something I haven’t figured out yet; the process might require taking a snapshot, and copying the snapshot to become a template.
Fedora Cloud, a lightweight optimized distribution for public/private clouds, containerization with Docker and Project Atomic.
Fedora Server, the traditional platform for running services, usually on a headless host whether virtualized or on baremetal.
Fedora Workstation, a developer-friendly desktop running a cutting edge OS.
Of course, as always, OpenStack/KVM and Docker get a lot of love, but Xen and XenServer are once again ignored. This post is my solution. With the prebuilt images distributed here and the kickstart scripts below, you can deploy Fedora 21 on your own XenServer (6.2+). Continue reading “Fedora 21 on XenServer”
When I first came to Penn, the website for the Nominations & Elections Committee looked like this:
No, this wasn’t the year 1999… this was in 2011.
NEC website redesign
I set out to redevelop and redesign this, upgrading it from a static HTML site edited over SFTP to a WordPress CMS on Canvas. More importantly, the website redesign in 2012 needed to fit the rebranding that Penn underwent that academic year. In other words, I wanted it to look more like the university’s design. (An email to the Communications office responsible for web assets clarified that we could, in fact, do this.)
The performance differences between the two types has been studied for some time. Once upon a time, PV was undoubtedly faster, free of the overhead associated with full hardware emulation. With newer hardware features that have been supported for the last few years, PVHVM, which takes advantage of features in the processor as well as a Linux kernel that recognizes that it is operating as a virtual guest, has surpassed PV performance in most arenas.
Benchmarks
Benchmarks have severe limitations. The statistics here are only meant to be compared relatively among themselves—between the PV and PVHVM guests running exactly the same specs and software. It would be a futile exercise to compare them against VMs running on other servers, which might have better SANs, lighter workloads, or faster CPUs and RAM. The specific test profiles in the Phoronix software are also based on outdated versions of Apache httpd and nginx, which makes them unreliable for assessing real-world performance.
Some of the relevant comparisons:
It’s worth noting that CentOS 7 with a 3.10 kernel performed poorly compared to other distributions—both Fedora 20 (kernel 3.15) and Ubuntu 14.04 (kernel 3.13) outperformed CentOS on web serving workloads (not shown). But the evidence pretty conclusively showed that PVHVM generally performed better than PV on all of the operating systems.
To that end, I’d like to offer a prebuilt CentOS 7.0.1406 image that runs in PVHVM on XenServer. You should feel free to choose between this and the PV version from my previous post, depending on your needs. (If you need to accommodate higher density on your server, you might be better off with PV. Run benchmarks yourself to decide what you should use.)
As before, you can decompress (xz -d ___.xvz.xz or use your GUI of choice) then import through XenCenter (File – Import…) or the command line (xe vm-import filename=___.xva).
This image is provided with no guarantees. Please let me know in the comments if you find an issue with it.
A PVHVM system requires no special accommodations when installing, except that UEFI and GPT are not certain to be supported. Merely select the “Other install media” option in XenCenter, and use a standard installer ISO/DVD. Do NOT use any of the CentOS or RHEL templates! Those will create PV guests.
An automated kickstart like the one used to create the image above may help you build a generic template. Hit <Tab> at the CentOS DVD menu and append a ks=__ parameter to use a kickstart script hosted at an HTTP location.
If you were able to use this image or the kickstart, I’d appreciate a brief comment to let me know it worked for you. I’d hope that the bandwidth costs are going to good use!
Update (2015-10-21): since the images below have not been updated since July 2014, I highly recommend that you no longer use them; instead, you should use a kickstart script to install from the latest packages. Also, as I’ve noted in the comments, PVHVM will likely perform better overall. Update (2017-04-28): the .xva files have now been deleted; instead see this new guide for converting .qcow2 cloud images for use with XenServer.
If you’re lazy, you can skip the process and download prebuilt XenServer images that you can decompress (xz -d ___.xvz.xz or use your GUI of choice) then import through XenCenter (File – Import…) or the command line (xe vm-import filename=___.xva). These images do not have XenServer Tools installed, because you should install them yourself using the tools that match your XenServer version.
These images are provided with no guarantees. Please let me know (comments below are fine) if you find an issue with them.
It’s true that private cloud IaaS tools like OpenStack have been growing in popularity, and increasingly, vendors are distributing cloud images suitable for OpenStack (see Fedora Cloud images). My instructions in the rest of this blog post won’t help you build images for an IaaS platform. You might as well just get the vendor cloud images if you’re going to be using OpenStack.
You can skip down to the next heading if you don’t want to read about my experiences with OpenStack.
OpenStack isn’t right for everyone
I tested out OpenStack + KVM on an HP baremetal server with 12 physical cores and 48 GB of RAM recently. Despite the simplified installation process enabled by RedHat, it didn’t fit my needs, and I went back to using XenServer. OpenStack was a mismatch for my needs and also has a few infrastructural problems, and hopefully someone reading this will be able to tell me if I’m out of my mind or if these are actually legitimate concerns:
Size of deployment. Even though it can be used on a single baremetal server, OpenStack is optimal for deployments involving larger private clouds with many servers. When working with a single host, the complexity wasn’t worth my time. This is where admins need to judge whether they fall on the virtualization side or the cloud side of a very blurry line.
Complex networking. Networking in OpenStack using Neutron follows an EC2 model with floating IPs, though there are various “flat” options that will more simply bridge virtual networks. The floating IP model is poorly suited to situations when the public Internet-routable network has an existing external DHCP infrastructure, and no IPs or IP ranges can be reserved.
Abstraction. From what I could tell, there were ridiculous levels of abstraction. On a single-host node that hosts the block storage service (Cinder) as well as the virtualization host (Nova), an LVM logical volume created by Cinder would be shared as an iSCSI target, mounted by the same machine, and only then exposed to qemu-kvm by the Nova compute service.
Resource overhead. The way that packstack deployed the software on a CentOS 7 server placed OpenStack—compute service (Nova), block storage (Cinder), object storage (Swift), image storage (Glance), networking (Neutron), identity service (Keystone), and control panel (Horizon)—and all its dependency components—MariaDB, RabbitMQ, memcache, Apache httpd, KVM hypervisor, Open vSwitch, and whatever else I’m forgetting—on the nonvirtualized baremetal operating system. That’s a ton of services, and attack surface, for the host… And the worst part: because each of those programs realized that the server has 48 GB of physical RAM, they all helped themselves to as much as they could grab. MariaDB was configured automatically with huge memory buffers; RabbitMQ seemed to claim more than 3 GB of virtual memory. By the time any virtual guests had been started up, the baremetal system was reporting at least 7-9 GB of used RAM!
That’s when I had enough. Technical benefits of KVM aside, and management capabilities of OpenStack aside, I decided to move firmly back into virtualization territory. XenServer’s minimal dom0 design and light overhead was much more suitable for my needs.
Note your XenServer version
XenServer Creedence requires no fixes
XenServer Creedence alpha 4—the most recent prerelease version that I am using—uses a newer Xen hypervisor and bundled tools. Consequently, it seems to have a patched version of pygrub that can read the CentOS 7 grub.cfg, which uses the keywords linux16 and initrd16, and which is no longer affected by the same parsing bugs on default="${next_entry}" that necessitated the fixes at the end of the post-installation script.
Fixes needed by XenServer 6.2
However, XenServer 6.2 cannot handle the out-of-box installation (ext4 /boot partition, GPT, etc) under paravirtualization without additional customization. Kickstart scripts are still the easiest way to ensure that the guests are bootable out of the box, by predefining a working partition scheme, selecting a minimal package set, fixing the bootloader script, and generalizing the installation.
Additionally, XenServer 6.2 lacks a compatible built-in template for Ubuntu 14.04. Thus, it cannot use netboot to install 14.04; you must use the 14.04 server ISO image to install.
The scripts to do it yourself
CentOS 7
I determined that the true minimal @core installation is too minimal for typical needs (it doesn’t come with bind-utils, lsof, zip, etc) so this image is installed with the @base group. About 456 packages are included.
IMPORTANT: Boot up a CentOS 7 installer with parameters. You can use the netboot ISO, or boot directly from an HTTP mirror (e.g. http://mirror.rackspace.com/CentOS/7.0.1406/os/x86_64/). This is also the screen where you specify the boot parameters: console=hvc0 utf8 nogpt noipv6 ks=https://github.com/frederickding/xenserver-kickstart/raw/develop/centos-7.0/cent70-server.ks
Note: you may have to host the kickstart script on your own HTTP server, since occasional issues, possibly SSL-related, have been observed with netboot installers being unable to fetch the raw file through GitHub.
Assign vCPUs and RAM; Anaconda demands around 1 GB of memory when no swap partition is defined. (screenshot)
Create a primary disk for the guest. Realistically, you need only 1-2 GB for the base installation, but XenServer may force you to set a minimum of 8 GB. No matter what size you set here, the kickstart script will make the root partition fill the free space. (screenshot)
IMPORTANT: Configure networking for the guest. It’s critical that this works out of the box (i.e. DHCP), since the script asks Anaconda to download packages from the HTTP repositories. (screenshot)
Finish the wizard and boot up the VM.
The VM will boot into the CentOS 7 installer, which will run without interaction until it completes.
Press <Enter> to halt the machine. At this point, you can remove the ISO (if any).
Boot up the VM. It should go right into the login screen on the command line — from which you can do further configuration as needed.
Ubuntu 14.04
As mentioned above, this process will differ slightly if you are on XenServer 6.2 or older.
On XenServer Creedence: Use the Ubuntu 14.04 template. On XenServer 6.2 or older: Use the Ubuntu 12.04 template for a baseline.
IMPORTANT:On any version of XenServer: Boot up the 14.04 server ISO installer with parameters. You cannot use the netboot ISO. On XenServer Creedence only: You can boot from an HTTP mirror, such as http://us.archive.ubuntu.com/ubuntu/. This is also the screen where you specify the boot parameters: append ks=https://github.com/frederickding/xenserver-kickstart/raw/develop/ubuntu-14.04/trusty-server.ks to the existing parameters line.
Note: you may have to host the kickstart script on your own HTTP server, since issues, possibly SSL-related, have been observed with netboot installers being unable to fetch the raw file through GitHub.
Set a host server.
Assign vCPUs and RAM.
Create a primary disk for the guest. Realistically, you need only about 2 GB for the base installation, but XenServer may force you to set a minimum of 8 GB. No matter what size you set here, the kickstart script will make the root partition fill the free space.
IMPORTANT: Configure networking for the guest. It’s critical that this works out of the box (i.e. DHCP), since the script asks the installer to download packages from online repositories.
Finish the wizard and boot up the VM.
The VM will boot into the Ubuntu installer, which will run without interaction until it completes.
Note: if you are warned that Grub is not being installed, you should nevertheless safely proceed with installation.
Press <Enter> to halt the machine. At this point, you can remove the ISO (if any).
Boot up the VM. It should go right into the login screen on the command line — from which you can do further configuration as needed, such as installing XenServer Tools.
Final thoughts
I recognize that these instructions require the use of a Windows program—XenCenter. I have not tried to conduct this installation using command line tools only. If you are a users without access to a Windows machine from which to run XenCenter, you can nevertheless deploy the kickstart-built XVA images above using nothing more than 2 or 3 commands on the dom0. If anyone can come up with a process to run through a kickstart-scripted installation using the xe shell tools, please feel free to share in the comments below.
At the same time, I started looking at switching domUs from Ubuntu—which worked great, by the way—to Fedora. This was purely due to personal preference, given my penchant for keeping software up-to-date even at the risk of instability, not any failings of Ubuntu.
The issue, of course, is that Fedora isn’t supported out of the box by XenServer or its management console XenCenter, and the wealth of knowledge out there typically pertains to older versions of Fedora and XenServer. Some IT firm even posted a tip to use the “Other install media” option for installing Fedora 20, which practically defeats the point of using Xen virtualization, since that creates a fully-virtualized guest (HVM) rather than a paravirtualized domU.
So I set out to update the existing methods of installing older versions of Fedora as a paravirtualized guest to the new release, Fedora 20 “Heisenbug”.
Credit where credit is due
I’m a sucker for giving credit to everyone and anyone, but in this case a few sources really formed the basis for what I’ve done:
The master-branch files are typically tested, while the develop-branch files may introduce new features that are not yet fully vetted. (As the MIT License describes, everything is provided with no guarantees.)
The basic idea behind the post-installation script here is to create a legacy GRUB menu.lst file, which pygrub on XenServer can interpret to boot into a paravirtualized guest.
Update: now, the post-installation script doesn’t bother with a fake menu.lst at all, and instead makes GRUB2 configuration files. Based on reports that making slight alterations to the autogenerated GRUB2 grub.cfg file to make it compatible works, and based on the changes made to pygrub in upstream Xen (which have not yet been integrated into XenServer 6.2.0 SP1), I made the script tweak GRUB2 files and regenerate a grub.cfg with grub2-mkconfig. This should be robust enough to support future kernel updates!