I’ve got 3 invites for the 64 GB Sandstone Black model of the OnePlus One, about to expire on January 1, 2015. Comment or tweet at me.
Who wants a OnePlus One invite?


Technology, law, life, and more.
Computers, hardware, software, and that sort of thing.
I’ve got 3 invites for the 64 GB Sandstone Black model of the OnePlus One, about to expire on January 1, 2015. Comment or tweet at me.
![]()
Fedora 21 was just released earlier this week on December 9, 2014. The biggest change was the separation of the distribution into three “products”:
Of course, as always, OpenStack/KVM and Docker get a lot of love, but Xen and XenServer are once again ignored. This post is my solution. With the prebuilt images distributed here and the kickstart scripts below, you can deploy Fedora 21 on your own XenServer (6.2+).
Continue reading “Fedora 21 on XenServer”
I am transitioning PGP keys from an old 2048-bit RSA key to a new 8192-bit RSA master key with subkeys.
Continue reading “PGP key transition”
Following my previous post on running CentOS 7 and Ubuntu 14.04 as fully-paravirtualized guests on XenServer, I ran some benchmarks to compare the relative performance of fully-paravirtualized (henceforth abbreviated PV) domUs against HVM guests using paravirt drivers and interrupts/timers (henceforth PVHVM).
The performance differences between the two types has been studied for some time. Once upon a time, PV was undoubtedly faster, free of the overhead associated with full hardware emulation. With newer hardware features that have been supported for the last few years, PVHVM, which takes advantage of features in the processor as well as a Linux kernel that recognizes that it is operating as a virtual guest, has surpassed PV performance in most arenas.
Benchmarks have severe limitations. The statistics here are only meant to be compared relatively among themselves—between the PV and PVHVM guests running exactly the same specs and software. It would be a futile exercise to compare them against VMs running on other servers, which might have better SANs, lighter workloads, or faster CPUs and RAM. The specific test profiles in the Phoronix software are also based on outdated versions of Apache httpd and nginx, which makes them unreliable for assessing real-world performance.

Some of the relevant comparisons:


It’s worth noting that CentOS 7 with a 3.10 kernel performed poorly compared to other distributions—both Fedora 20 (kernel 3.15) and Ubuntu 14.04 (kernel 3.13) outperformed CentOS on web serving workloads (not shown). But the evidence pretty conclusively showed that PVHVM generally performed better than PV on all of the operating systems.
Update (2017-04-28): Because these images are now out of date and insecure, the .xva images have been deleted. You should instead use the distribution’s latest cloud images in .qcow2 format, converted for XenServer.
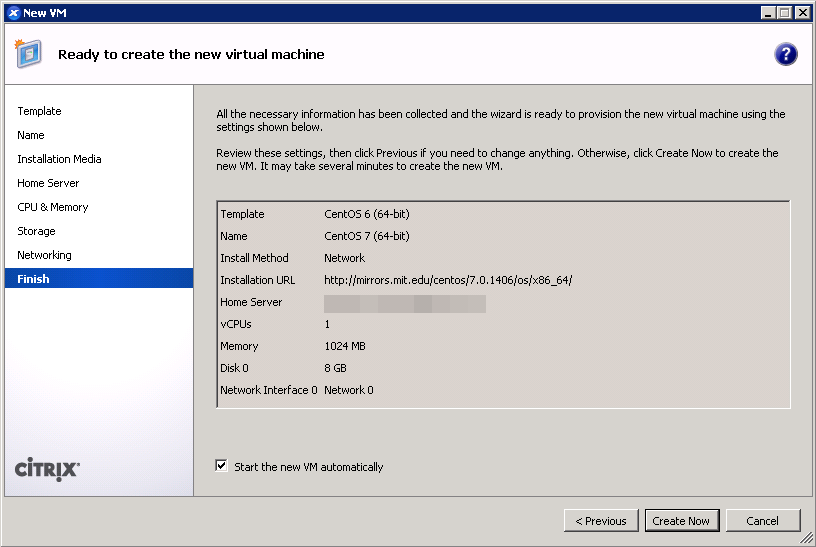
To that end, I’d like to offer a prebuilt CentOS 7.0.1406 image that runs in PVHVM on XenServer. You should feel free to choose between this and the PV version from my previous post, depending on your needs. (If you need to accommodate higher density on your server, you might be better off with PV. Run benchmarks yourself to decide what you should use.)
As before, you can decompress (xz -d ___.xvz.xz or use your GUI of choice) then import through XenCenter (File – Import…) or the command line (xe vm-import filename=___.xva).
This image is provided with no guarantees. Please let me know in the comments if you find an issue with it.
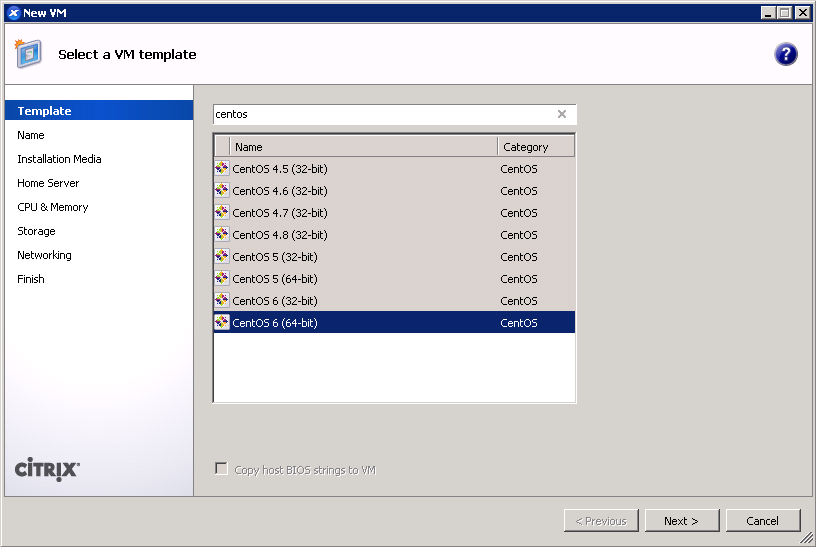
c3ef221ae886cea4c3be09996d0cb2049dc2ac8f10dd5323f85beee25ce9d4cd44583aa3cdbf1db1c62b2db05530ce6fcentosAsdfqwertyA PVHVM system requires no special accommodations when installing, except that UEFI and GPT are not certain to be supported. Merely select the “Other install media” option in XenCenter, and use a standard installer ISO/DVD. Do NOT use any of the CentOS or RHEL templates! Those will create PV guests.
An automated kickstart like the one used to create the image above may help you build a generic template. Hit <Tab> at the CentOS DVD menu and append a ks=__ parameter to use a kickstart script hosted at an HTTP location.
The image above was built with the cent70-server-pvhvm.ks script at revision e278f2a8139fb624bc2cdcd9a80d8b51b7910de3, embedded below. If there are any updates to this script, they will be added to the develop branch on GitHub. You can also edit it yourself before deploying.
[github file=/frederickding/xenserver-kickstart/blob/e278f2a8139fb624bc2cdcd9a80d8b51b7910de3/centos-7.0/cent70-server-pvhvm.ks][/github]
If you were able to use this image or the kickstart, I’d appreciate a brief comment to let me know it worked for you. I’d hope that the bandwidth costs are going to good use!
Update (2015-10-21): since the images below have not been updated since July 2014, I highly recommend that you no longer use them; instead, you should use a kickstart script to install from the latest packages. Also, as I’ve noted in the comments, PVHVM will likely perform better overall. Update (2017-04-28): the .xva files have now been deleted; instead see this new guide for converting .qcow2 cloud images for use with XenServer.
One of the most frequently visited blog posts on my site is a guide to installing paravirtualized Fedora 20 on XenServer using an automated kickstart file. With the recent releases of RedHat Enterprise Linux 7 (and the corresponding CentOS 7 — versioned at 7.0.1406) and Ubuntu 14.04 LTS “Trusty Tahr”, as well as prerelease versions of the next iteration of XenServer, I thought it was time to revisit this matter and show you the scripts for optimized paravirtualized guests running the newest versions of CentOS and Ubuntu.
If you’re lazy, you can skip the process and download prebuilt XenServer images that you can decompress (xz -d ___.xvz.xz or use your GUI of choice) then import through XenCenter (File – Import…) or the command line (xe vm-import filename=___.xva). These images do not have XenServer Tools installed, because you should install them yourself using the tools that match your XenServer version.
These images are provided with no guarantees. Please let me know (comments below are fine) if you find an issue with them.
ab69ee14476120f88ac2f404d7584ebb29f9b38bdf624f1ae123bb45a9f1ed9491e3ce39790b0251f1a1fdfec2d9bef0centosAsdfqwerty1c691324d4e851df9131b6d3e4a081da3a6aee35959ed3defc7f831ead9b40f2e2ed6cfb629f916b9af047a05f8a192dubuntuAsdfqwertyIt’s true that private cloud IaaS tools like OpenStack have been growing in popularity, and increasingly, vendors are distributing cloud images suitable for OpenStack (see Fedora Cloud images). My instructions in the rest of this blog post won’t help you build images for an IaaS platform. You might as well just get the vendor cloud images if you’re going to be using OpenStack.
You can skip down to the next heading if you don’t want to read about my experiences with OpenStack.
I tested out OpenStack + KVM on an HP baremetal server with 12 physical cores and 48 GB of RAM recently. Despite the simplified installation process enabled by RedHat, it didn’t fit my needs, and I went back to using XenServer. OpenStack was a mismatch for my needs and also has a few infrastructural problems, and hopefully someone reading this will be able to tell me if I’m out of my mind or if these are actually legitimate concerns:
That’s when I had enough. Technical benefits of KVM aside, and management capabilities of OpenStack aside, I decided to move firmly back into virtualization territory. XenServer’s minimal dom0 design and light overhead was much more suitable for my needs.
XenServer Creedence alpha 4—the most recent prerelease version that I am using—uses a newer Xen hypervisor and bundled tools. Consequently, it seems to have a patched version of pygrub that can read the CentOS 7 grub.cfg, which uses the keywords linux16 and initrd16, and which is no longer affected by the same parsing bugs on default="${next_entry}" that necessitated the fixes at the end of the post-installation script.
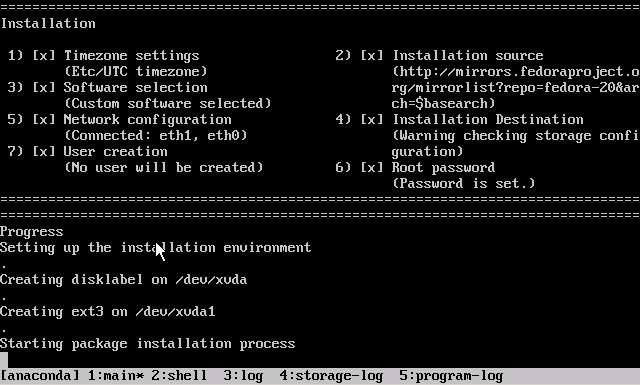
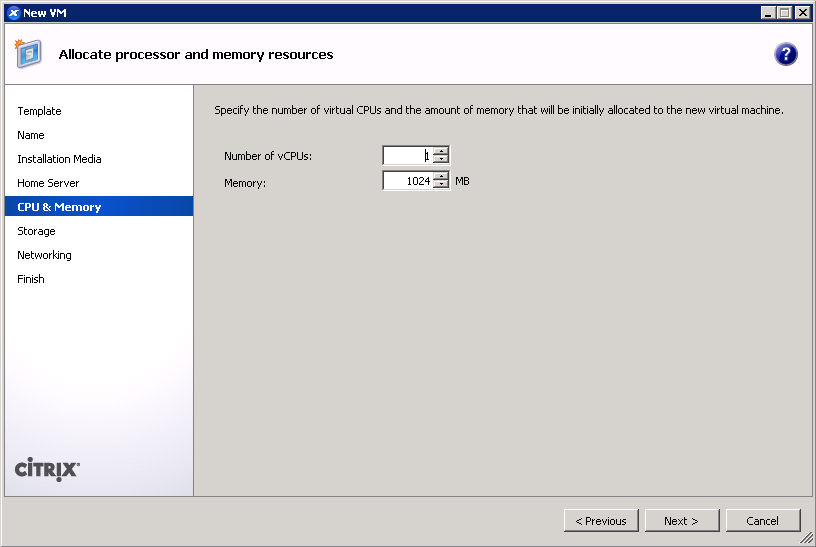
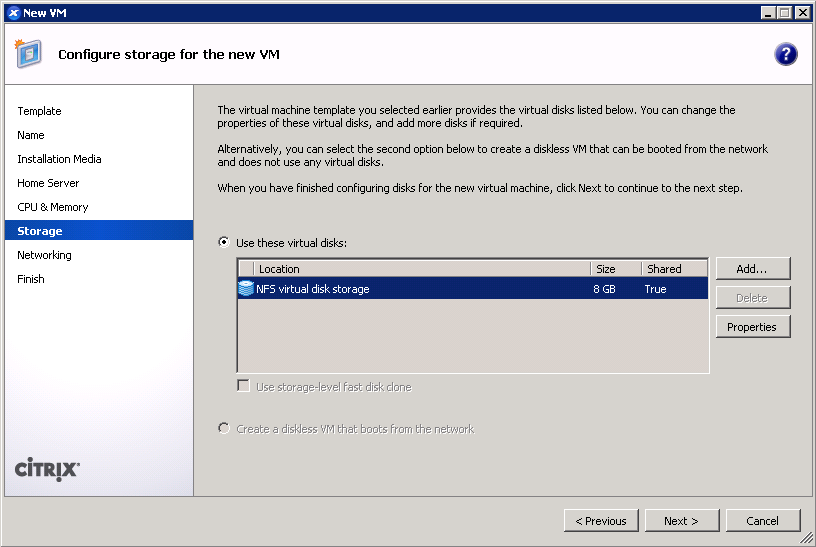
However, XenServer 6.2 cannot handle the out-of-box installation (ext4 /boot partition, GPT, etc) under paravirtualization without additional customization. Kickstart scripts are still the easiest way to ensure that the guests are bootable out of the box, by predefining a working partition scheme, selecting a minimal package set, fixing the bootloader script, and generalizing the installation.
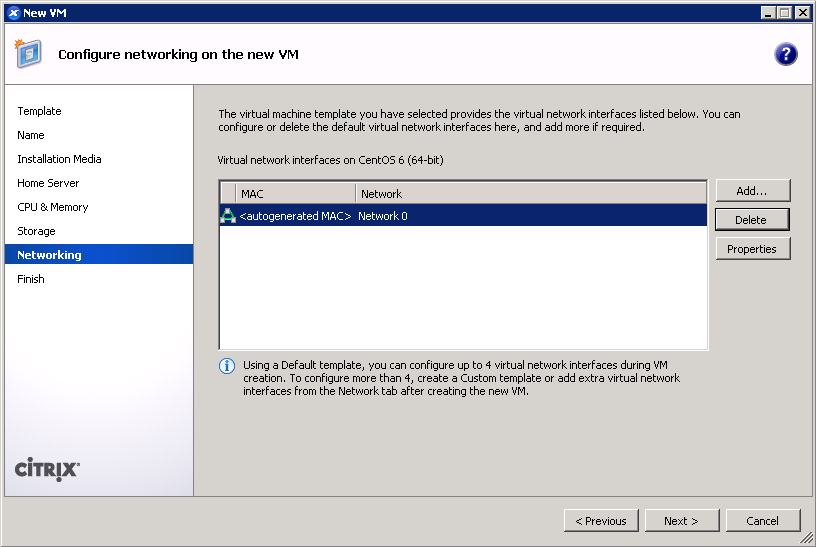
Additionally, XenServer 6.2 lacks a compatible built-in template for Ubuntu 14.04. Thus, it cannot use netboot to install 14.04; you must use the 14.04 server ISO image to install.
I determined that the true minimal @core installation is too minimal for typical needs (it doesn’t come with bind-utils, lsof, zip, etc) so this image is installed with the @base group. About 456 packages are included.
[github file=”/frederickding/xenserver-kickstart/blob/develop/centos-7.0/cent70-server.ks”]
[github file=”/frederickding/xenserver-kickstart/blob/develop/ubuntu-14.04/trusty-server.ks”]
console=hvc0 utf8 nogpt noipv6 ks=https://github.com/frederickding/xenserver-kickstart/raw/develop/centos-7.0/cent70-server.ks
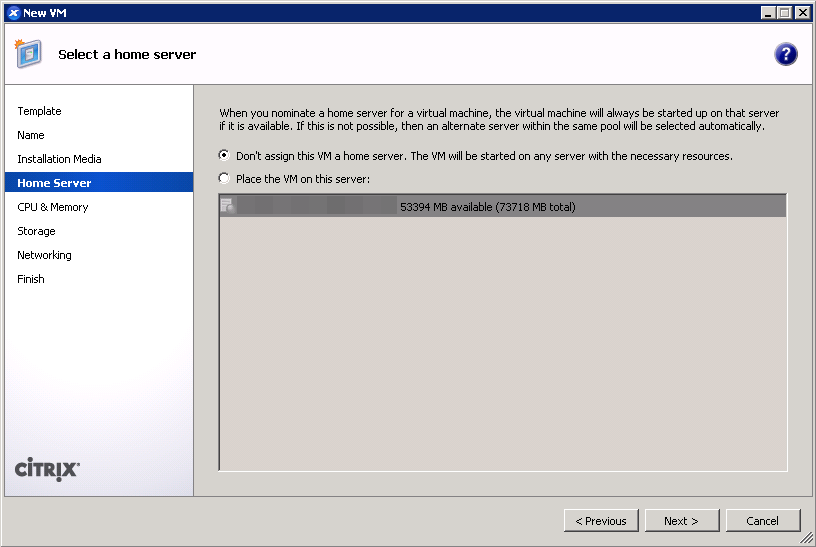
As mentioned above, this process will differ slightly if you are on XenServer 6.2 or older.
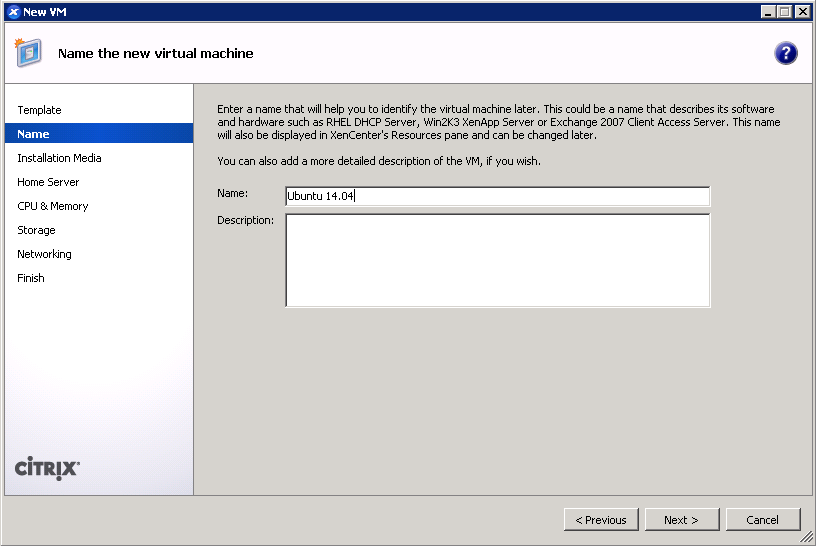
 On XenServer 6.2 or older: Use the Ubuntu 12.04 template for a baseline.
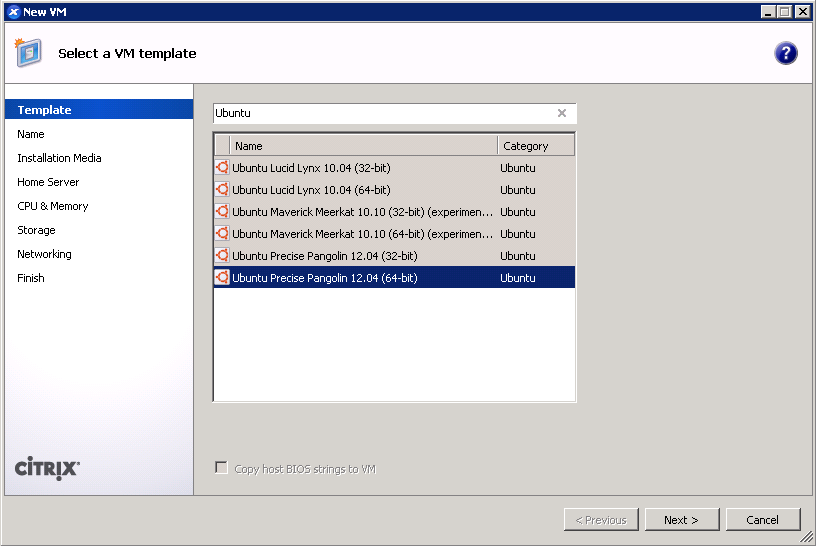
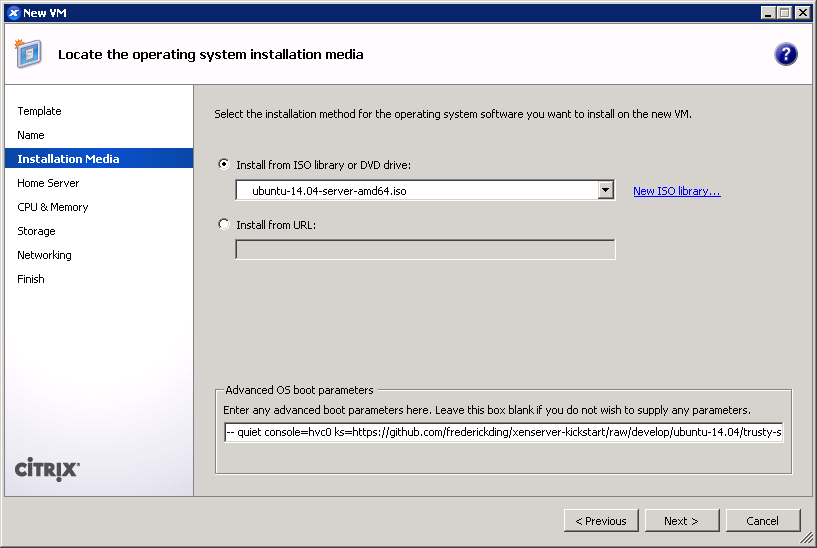 This is also the screen where you specify the boot parameters: append
 ks=https://github.com/frederickding/xenserver-kickstart/raw/develop/ubuntu-14.04/trusty-server.ks to the existing parameters line.Note: if you are warned that Grub is not being installed, you should nevertheless safely proceed with installation.
I recognize that these instructions require the use of a Windows program—XenCenter. I have not tried to conduct this installation using command line tools only. If you are a users without access to a Windows machine from which to run XenCenter, you can nevertheless deploy the kickstart-built XVA images above using nothing more than 2 or 3 commands on the dom0. If anyone can come up with a process to run through a kickstart-scripted installation using the xe shell tools, please feel free to share in the comments below.
I hope this has helped! I welcome your feedback.

To whichever engineers at Hewlett-Packard decided that it would make sense to pollute our frequencies with unneeded ad-hoc printer wifi networks enabled by default… You messed up.
Now every university dorm has to cope with unimportant personal printers putting out stronger signals than the nearest real access point. And houses in residential neighbourhoods receive neighbours’ printer signals more strongly than the high-power N/AC router.
I get that owners can connect them to routers instead of being separate APs. But guess who’s not turning off this “feature”? All of your least tech savvy customers.
(Side note: Comcast’s wider deployment of cable modem-router devices in homes and businesses with secondary xfinitywifi hotspots produces the same issue when customers are plugging in their own wireless routers right next to the Comcast device. I love using xfinitywifi, but there are real issues unless Comcast has configured these hotspots to scan for surrounding networks before deciding whether to broadcast a signal. And again, while there may be an opt out option, it’s the least tech savvy users who don’t turn it off, who generate potential interference for their neighbours. Negative externalities!)
It bothers me that the current default is a situation where tech-dumb people piss off tech-smart ones.
Updated 2014-07-13 with corrected links to develop-branch version and GitHub’s new user content domain name.
Updated 2014-07-17: see this newer blog post for instructions, kickstart scripts, and prebuilt images for CentOS 7 and Ubuntu 14.04.
Earlier this year, I installed Xen Cloud Platform (XCP) 1.6 on an off-lease Dell CS24-TY with two quad-core Intel Xeon CPUs and 72 GB of RAM. (Those machines are sold by Dell Financial Services and on eBay for unbelievably low prices, for previous generation servers of such capability.) When Citrix open-sourced XenServer, I decided to upgrade XCP 1.6 to the full-featured XenServer 6.2.0 SP1, which added a few formerly-proprietary features for larger pools (which I do not have) and improved guest support for various OSes including Windows 8/Server 2012 among other changes.
At the same time, I started looking at switching domUs from Ubuntu—which worked great, by the way—to Fedora. This was purely due to personal preference, given my penchant for keeping software up-to-date even at the risk of instability, not any failings of Ubuntu.
The issue, of course, is that Fedora isn’t supported out of the box by XenServer or its management console XenCenter, and the wealth of knowledge out there typically pertains to older versions of Fedora and XenServer. Some IT firm even posted a tip to use the “Other install media” option for installing Fedora 20, which practically defeats the point of using Xen virtualization, since that creates a fully-virtualized guest (HVM) rather than a paravirtualized domU.
So I set out to update the existing methods of installing older versions of Fedora as a paravirtualized guest to the new release, Fedora 20 “Heisenbug”.
I’m a sucker for giving credit to everyone and anyone, but in this case a few sources really formed the basis for what I’ve done:
Needless to say, both of these sources are super helpful, although none of them really work out of the box for what I’m doing.
If you’re already experienced and you’re just looking for the kickstart, here it is. For installation instructions, see below.
I’ve created a GitHub repository for these, and I might add files for RHEL/CentOS 6.5 in the future, too.
Here’s the master-branch version: (if you’re adventurous, try the develop-branch version)
[github file=”/frederickding/xenserver-kickstart/blob/master/fedora-20/f20-server.ks”]
The master-branch files are typically tested, while the develop-branch files may introduce new features that are not yet fully vetted. (As the MIT License describes, everything is provided with no guarantees.)
The basic idea behind the post-installation script here is to create a legacy GRUB menu.lst file, which pygrub on XenServer can interpret to boot into a paravirtualized guest.
Update: now, the post-installation script doesn’t bother with a fake menu.lst at all, and instead makes GRUB2 configuration files. Based on reports that making slight alterations to the autogenerated GRUB2 grub.cfg file to make it compatible works, and based on the changes made to pygrub in upstream Xen (which have not yet been integrated into XenServer 6.2.0 SP1), I made the script tweak GRUB2 files and regenerate a grub.cfg with grub2-mkconfig. This should be robust enough to support future kernel updates!
This procedure assumes that you’re familiar with XenCenter and have it running already. Continue reading “Installing Fedora 20 as a paravirtualized guest in XenServer with kickstart”
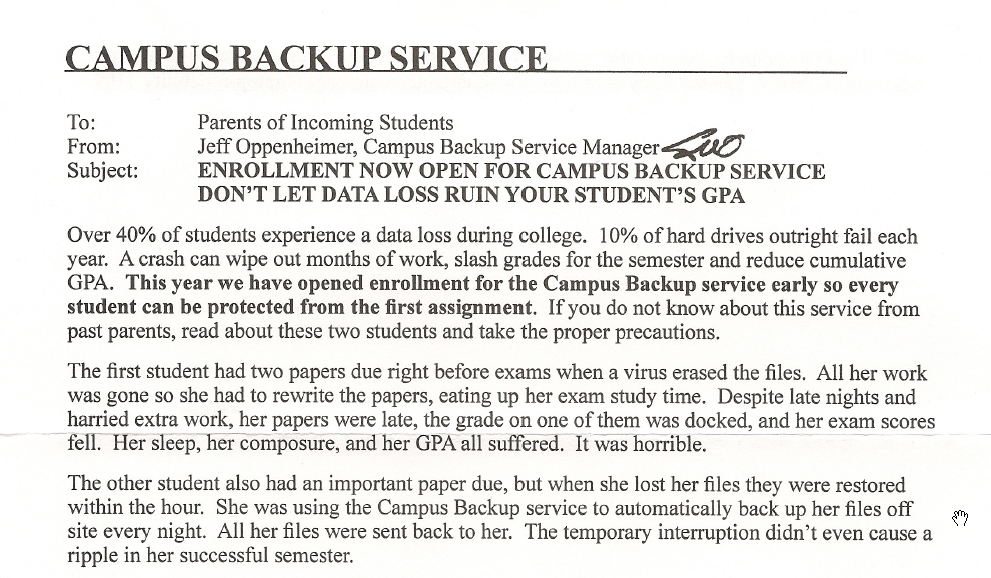
If you’re a freshman at Penn or many of the other universities that are raking in revenue from freshmen beyond tuition and fees, you may have received e-mails and letters offering all sorts of wonderful things. The one that caught my attention was something called “Campus Backup Service”.
It’s a cleverly marketed service that tries to leverage the anxiety of freshmen and parents to sell you something you don’t need — or rather, something you need, but not from this company.

There’s a disaster scenario — a student without backup suffers a virus infection on her laptop and… “her sleep, her composure, and her GPA all suffered… it was horrible”. There’s an alternate scenario — someone uses this company’s service, and avoids the disaster.
Yes, college students need a convenient and viable form of backup, just as all computer users do, but not from this company. This is almost a scam (but not quite). (Notice how they target “parents of incoming students”, who might be less tech-savvy than college students?)
Vinay Dinesh and I are both Information Technology Advisor Managers (ITA Managers, for short) at the University of Pennsylvania, and we are writing, as individuals, to help you find the right backup solution, whether it’s as simple as copying files to an external hard drive, or syncing files to the cloud. But Campus Backup Service isn’t right. (See our upcoming collaborative post to see how you can back up your files the right way.)
Continue reading “Incoming college freshmen: Campus Backup Service is a ripoff”