Office 2010 Technical Preview: Part 1

This is the first part of my posts about Office 2010. Last night, I received an invitation to the Office 2010 Technical Preview, and today, I am attempting to install it on my Windows 7 RC machine.

Legal notice: since this isn’t a private beta, I am allowed to discuss the preview and my experiences with it. However, I am not allowed to share product keys, installer files, and documents to which I have access by virtue of the invitation. The contract that binds me with reference to the technical documentation quotes as follows:

You […] agree: (a) to refrain from disclosing or distributing the Confidential Information to any third party for five (5) years from the date of disclosure of the Confidential Information by Microsoft to Company/You; (b) to refrain from reproducing or summarizing the Confidential Information…

Thankfully, there’s a public pressroom for Office 2010 information, from which I was able to get equivalents of the stuff in the confidential documents. Here’s some information for you.

System Requirements

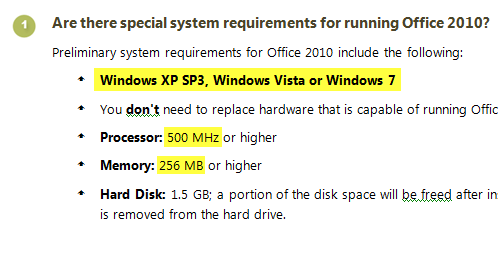
Office 2010 is designed to work on computers with very limited resources; after all, many businesses were concerned that they would once again need to upgrade their hardware. Office hasn’t really necessitated hardware upgrades in the past; Office 2003 ran very well on old Dell OptiPlex machines on Windows 2000, and Office 2007 ran quite well on older XP laptops.

The specific details are in the FAQs document.

Office 2010 System Requirements; click to see full image

The installers are rather compact; the Technical Preview 32-bit/64-bit installers for Office 2010 Professional are no more than 600 MB each.

64-bit editions

I’m currently on Windows 7 RC 64-bit edition, but I resolved ultimately to install the 32-bit edition of Office 2010. This is due to the following reasons:

  • The 64-bit edition of Office 2010 does not support most add-ins.
    Users of software with add-ins in Office programs will find that most of them do not work with the 64-bit edition of Office 2010. Software vendors are expected to release newer 64-bit add-ins, but users must use the 32-bit edition for compatibility with older add-ins.
  • One cannot upgrade Office 2007 to Office 2010 64-bit.
    According to the technical documentation, “2007 Office system cannot be upgraded to native Office 2010 64-bit.
  • I don’t work with spreadsheets greater than 2 GB in size.
    The documentation listed a number of benefits of using the 64-bit edition. The central point was being able to open large Excel spreadsheets. Since I don’t do this, the benefits of the 64-bit architecture are insignificant when it comes to Office 2010.

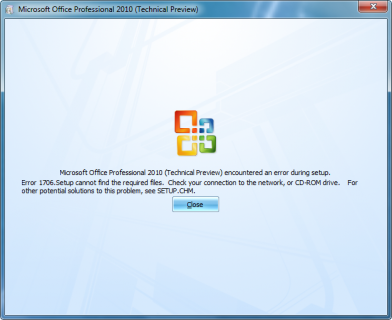
Screenshots of my installation will come in the next installment of these posts. That is, after I manage to install it. At the moment I’m getting the following error with the 32-bit installer, after customizing the install and even going through a few minutes of the installation progress bar.

The error I'm getting with the installer

If this persists with the 32-bit installer, I may have no choice but to try the 64-bit installation.

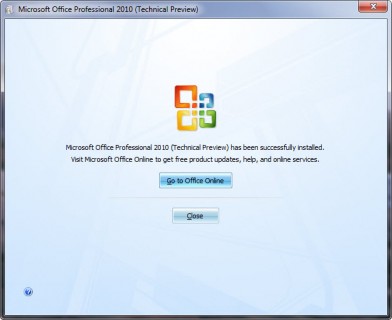
Update: the installer has now succeeded. More will be coming!

Finally, I've managed to install it.

Update: Part 2 is here, with screenshots and commentary on interface improvements!

Subversion for Beginners

I mentioned previously that I wanted to post how Subversion works (on the surface, for beginners) and how I use it for my development needs.

To create my WordPress plugins, Simpler iPaper and Simpler CSS, using SVN has been a must; after all, the only way to release new versions of the plugins is through SVN. I also keep this site’s WordPress installation up-to-date on the development version using Subversion. Additionally, in my current efforts to develop a working solution for HDTV’s in business and organizational settings, Display UI is being developed using Subversion for version control.

You get the idea. I use it on a daily basis, and for practical purposes. I don’t claim to understand the fine details, but hopefully this post gives you an idea of how I use it and how you can, too.

Source Code SnapshotSo what is version control? Simply put, it’s a way of keeping track of the changes made to files. It’s often impractical to make manual backups of a file before every set of changes to it, so version control systems like CVS and SVN emerged to help people — especially developers and programmers — keep track of their files, share changes with team members, and prevent stupid mistakes.

Accidentally deleted your code? Revert your changes. Came up with an ingenious way (that works) to do something? Commit your changes. Need to get the latest revision of all the files? Update the working copy.

Perhaps the most practical application of systems like Subversion is in team development. When three or more people are working on the same set of files, it’s useful to be able to merge the changes seamlessly, see the changes others have made, or even work separately on branches (kind of like forks) and tags (usually released versions that are being maintained).

I did write that I don’t claim to understand the fine details. If you really want to understand Subversion, I highly recommend this book by members of the development team: Version Control with Subversion, or the book online.

Let’s talk about how to use it. Hard-core programmers often choose to use the command line tools, where they type commands like svn up to update the files. Beginners will be glad to know that there are implementations with GUI‘s, like RapidSVN and TortoiseSVN. Eclipse users may use Subversive or Subclipse, “team providers” that let coders easily perform version control tasks inside the IDE.

Subversion tasks can be done in Windows Explorer

Assuming that you’re using the command line binaries — which you can get from the Subversion site, and I recommend official CollabNet builds where possible — most of the basic tasks are rather easy.

Instead of right-clicking and picking options from a menu, tasks are done by typing commands.

First of all, a ‘repository’ is a hosted location containing all of the code, revisions and metadata. Often, one can access a repository via HTTP, as in the case of WordPress, which is found at http://core.svn.wordpress.org/ .

To ‘checkout’ a repository means to make a local copy (known as a ‘working copy’) of the contents. That’s what we have to do first when working with an established project: get the code from the repository.

To do so, type the following at an open shell (on Linux/Mac OS X) or command prompt: (don’t type the ‘$’ — that’s just a placeholder for the prompt you’ll see, such as frederick@ubuntu-pc:~# or [frederick@fedora-vm Desktop]$ — the specific prompt will differ depending on your machine and platform)

$ svn checkout http://core.svn.wordpress.org/trunk/ wordpress/

Windows users would do the same, but at a command prompt — again, without the dollar sign.

That command invokes the svn executable and tells it to checkout the WordPress trunk directory to the local folder wordpress.

Continue reading “Subversion for Beginners”

Yay for WordPress 2.8 Release Candidate

Awesome! WordPress has just released the release candidate of WordPress 2.8, which seems to contain an awesome amount of improvements over WordPress 2.7 (most of them subtle and unexposed to the end user). I’ve been running the trunk version of WordPress for months now, and I have to say that WordPress 2.8 is stable and usable.

If you want to stay up-to-date with WordPress, you can try running it from SVN. I’ll post a little guide on how I do it soon.