Combining tar with logging and mbuffer

As a supplement to my last blog post on archiving to an LTO tape drive using conventional open source utilities like tar, this is how you can save a filelist of the tar output (same as would be outputted by tar -tvf /dev/nst0) to a text file, while also redirecting tar through mbuffer to the tape drive.

tar --label="backup-20230101-volume2" -b512 -cvf - --exclude='.DS_Store' --files-from=/tmp/directories-list.txt 2> >(tee /tmp/tar-filelist.txt >&2) | mbuffer -m 4G -P 80 -s 262144 -o /dev/nst0

It’s critical that the output of tee is again redirected to stderr using >&2 — if you don’t do this, the text from the log will end up in the stdout that gets piped to the mbuffer, which will get written to tape. In that circumstance, tar will not be able to understand the archive when reading it back, since there will be spurious text data.

If you aren’t piping tar’s stdout through mbuffer, you can avoid the redirection problem because tar won’t be outputting to stdout at all. For example:

tar --label="backup-20230101-volume2" -b512 -cvf /dev/nst0 --exclude='.DS_Store' --files-from=/tmp/directories-list.txt 2> tee /tmp/tar-filelist.txt

Reformatting WD Red Pro 20TB (WD201KFGX) from 512e to 4Kn sector size

WD Red Pro marketing photo

TL;DR: it’s easy using Seagate’s openSeaChest utility. Jump down to How to do the reformat using openSeaChest_Format below for the guide.

I recently purchased a pair of 20TB hard drives to replace the array of 8TB drives from almost 4 years ago (one of which had failed last year, and had been replaced under warranty). The 4×8TB array uses as much as 34 watts in random read and idles at 20 watts.[1] The new 2×20TB would use about 13.8 watts when active, and 7.6 watts idle.[2]

A ZFS mirror would provide ~20TB usable capacity — an increase of 4TB along with a power consumption savings of up to 59%.

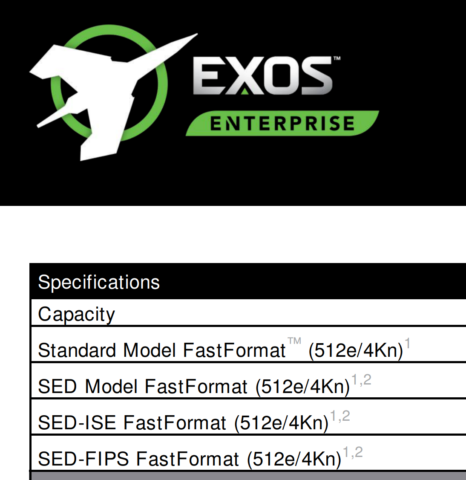
The only wrinkle was that these drives, unlike Seagate’s, are advertised only as 512e drives that emulate a 512-byte sector size, without any advertised capability to reformat in 4Kn. Many newer Seagate Exos drives have this capability built in (advertised as “FastFormat (512e/4Kn)”), whereas interestingly WD’s spec sheets for Red Pro drives no longer mention the sector size.

Exos spec sheet screenshot showing FastFormat (512e/4Kn)
Exos X16 spec sheet screenshot showing FastFormat (512e/4Kn)

This distinction between using emulated 512e and native 4K sector size doesn’t make much of a practical difference in 2022 in storage arrays, because ZFS typically writes larger blocks than that. But I still wanted to see whether I could.

FastFormat using Seagate’s openSeaChest

Usually it is a bad idea to use one vendor’s tools with another’s. There were a lot of forum posts suggesting that the right utility is a proprietary WD tool called “HUGO,” which is not published on any WD support site. Somebody made a tool for doing this on Windows too: https://github.com/pig1800/WD4kConverter .

But I am using these WD Red Pros in a NAS enclosure running Linux, not Windows.

Seagate has one of the leading cross-platform utilities for SATA/SAS drive configuration: SeaChest. I think I’ve even been able to run one of these on ESXi through the Linux compatibility layer. Seagate publishes an open-source repository for the code under the name openSeaChest, available on GitHub: https://github.com/Seagate/openSeaChest , and thanks to the license, vendors like TrueNAS are able to include compiled executables of openSeaChest on TrueNAS SCALE.

openSeaChest includes a utility called openSeaChest_Format (sometimes compiled with the executable name openSeaChest_FormatUnit):

# openSeaChest_FormatUnit --help
==========================================================================================
 openSeaChest_Format - openSeaChest drive utilities - NVMe Enabled
 Copyright (c) 2014-2022 Seagate Technology LLC and/or its Affiliates, All Rights Reserved
 openSeaChest_Format Version: 2.2.1-2_2_1 X86_64
 Build Date: Sep 26 2022
 Today: Sun Dec  4 13:49:42 2022	User: root
==========================================================================================
Usage
=====
	 openSeaChest_Format [-d <sg_device>] {arguments} {options}

Examples
========
	openSeaChest_Format --scan
	openSeaChest_Format -d /dev/sg? -i

*** excerpted ***
	--setSectorSize [new sector size]	
		This option is only available for drives that support sector
		size changes. On SATA Drives, the set sector configuration
		command must be supported. On SAS Drives, fast format must
		be supported. A format unit can be used instead of this
		option to perform a long format and adjust sector size.
		Use the --showSupportedFormats option to see the sector
		sizes the drive reports supporting. If this option
		doesn't list anything, please consult your product manual.
		This option should be used to quickly change between 5xxe and
		4xxx sector sizes. Using this option to change from 512 to 520
		or similar is not recommended at this time due to limited drive
		support

		WARNING: Set sector size may affect all LUNs/namespaces for devices
		         with multiple logical units or namespaces.
		WARNING (SATA): Do not interrupt this operation once it has started or 
		         it may cause the drive to become unusable. Stop all possible background
		         activity that would attempt to communicate with the device while this
		         operation is in progress
		WARNING: It is not recommended to do this on USB as not
		         all USB adapters can handle a 4k sector size.

I had a feeling openSeaChest could be used for my purposes, based on this information on StackExchange, indicating that the WD drives use ATA standards-defined “Set Sector Configuration Ext (B2h)” and “Sector Configuration Log.” Since that user was able to effect the reformat on a WD Ultrastar DC 14TB drive using camcontrol on FreeBSD, that was a good sign that the reformat should be possible. After all, the larger WD Red Pro drives are basically rebadged/binned Ultrastar drives.

This was confirmed later using openSeaChest_Format , but I also saw an encouraging sign in the drive info shown by openSeaChest_SMART -d /dev/sdX --SATInfo:

# openSeaChest_SMART -d /dev/sdf --SATInfo

*** excerpted ***
ATA Reported Information:
	Model Number: WDC WD201KFGX-68BKJN0
	Serial Number: REDACTEDSERIAL
	Firmware Revision: 83.00A83
	World Wide Name: REDACTEDSERIAL
	Drive Capacity (TB/TiB): 20.00/18.19
	Native Drive Capacity (TB/TiB): 20.00/18.19
	Temperature Data:
		Current Temperature (C): 44
		Highest Temperature (C): 45
		Lowest Temperature (C): 24
	Power On Time:  3 days 15 hours 
	Power On Hours: 87.00
	MaxLBA: 39063650303
	Native MaxLBA: 39063650303
	Logical Sector Size (B): 512
	Physical Sector Size (B): 4096
	Sector Alignment: 0
	Rotation Rate (RPM): 7200
	Form Factor: 3.5"
	Last DST information:
		DST has never been run
	Long Drive Self Test Time:  1 day 12 hours 6 minutes 
	Interface speed:
		Max Speed (Gb/s): 6.0
		Negotiated Speed (Gb/s): 6.0
	Annualized Workload Rate (TB/yr): 7437.88
	Total Bytes Read (TB): 33.87
	Total Bytes Written (TB): 40.00
	Encryption Support: Not Supported
	Cache Size (MiB): 512.00
	Read Look-Ahead: Enabled
	Write Cache: Enabled
	SMART Status: Unknown or Not Supported
	ATA Security Information: Supported
	Firmware Download Support: Full, Segmented, Deferred, DMA
	Specifications Supported:
		ACS-5
		ACS-4
		ACS-3
		ACS-2
		ATA8-ACS
		ATA/ATAPI-7
		ATA/ATAPI-6
		ATA/ATAPI-5
		ATA/ATAPI-4
		ATA-3
		ATA-2
		SATA 3.5
		SATA 3.4
		SATA 3.3
		SATA 3.2
		SATA 3.1
		SATA 3.0
		SATA 2.6
		SATA 2.5
		SATA II: Extensions
		SATA 1.0a
		ATA8-AST
	Features Supported:
		Sanitize
		SATA NCQ
		SATA NCQ Streaming
		SATA Rebuild Assist
		SATA Software Settings Preservation [Enabled]
		SATA In-Order Data Delivery
		SATA Device Initiated Power Management
		HPA
		Power Management
		Security
		SMART [Enabled]
		DCO
		48bit Address
		PUIS
		APM [Enabled]
		GPL
		Streaming
		SMART Self-Test
		SMART Error Logging
		EPC
		Sense Data Reporting [Enabled]
		SCT Write Same
		SCT Error Recovery Control
		SCT Feature Control
		SCT Data Tables
		Host Logging
		Set Sector Configuration
		Storage Element Depopulation

Drive information before the reformat

The WD201KFGX drive comes formatted in 512e by default.

openSeaChest is able to discover the drive’s capability to support 4096 sector sizes using the --showSupportedFormats flag.

# openSeaChest_FormatUnit -d /dev/sdf --showSupportedFormats

*** excerpted ***
/dev/sg6 - WDC WD201KFGX-68BKJN0 - REDACTEDSERIAL - ATA

Supported Logical Block Sizes and Protection Types:
---------------------------------------------------
  * - current device format
PI Key:
  Y - protection type supported at specified block size
  N - protection type not supported at specified block size
  ? - unable to determine support for protection type at specified block size
Relative performance key:
  N/A - relative performance not available.
  Best    
  Better  
  Good    
  Degraded
--------------------------------------------------------------------------------
 Logical Block Size  PI-0  PI-1  PI-2  PI-3  Relative Performance  Metadata Size
--------------------------------------------------------------------------------
               4096     Y     N     N     N                   N/A            N/A
               4160     Y     N     N     N                   N/A            N/A
               4224     Y     N     N     N                   N/A            N/A
*               512     Y     N     N     N                   N/A            N/A
                520     Y     N     N     N                   N/A            N/A
                528     Y     N     N     N                   N/A            N/A
--------------------------------------------------------------------------------

How to do the reformat using openSeaChest_Format

The command you want is --setSectorSize 4096

An example of this command is shown below, but you need to manually add --confirm this-will-erase-data to actually make it happen.

You must be certain you are acting on the correct drive! Use openSeaChest_Info -s to identify all connected drives.

To add just a tiny bit of friction to prevent drive-by readers from simply copying-and-pasting this command without thought, potentially wiping out the contents of their hard drive, I’m excluding it in the line below so you need to add it yourself. You also need to specify the correct drive instead of sdX.

# openSeaChest_FormatUnit -d /dev/sdX --setSectorSize 4096 --poll

In my example, it took only a few seconds, and the command provided confirmation that it was successful. Depending on your selected level of verbosity (-v [0-4]) you may see more detail about the ATA commands issued.

*** excerpted ***

Setting the drive sector size quickly.
Please wait a few minutes for this command to complete.
It should complete in under 5 minutes, but interrupting it may make
the drive unusable or require performing this command again!!

*** excerpted ***

Command Time (ms): 499.89

Set Sector Configuration Ext returning: SUCCESS

Successfully set sector size to 4096

After the instant reformat of the sector size, it is critical that you unplug and reinsert the hard drive to reinitialize it in the new format.

Drive information after the reformat

openSeaChest_SMART -d /dev/sdX --SATInfo shows this information:

*** excerpted ***

ATA Reported Information:
	Model Number: WDC WD201KFGX-68BKJN0
	Serial Number: REDACTEDSERIAL
	Firmware Revision: 83.00A83
	World Wide Name: REDACTEDSERIAL
	Drive Capacity (TB/TiB): 20.00/18.19
	Native Drive Capacity (TB/TiB): 20.00/18.19
	Temperature Data:
		Current Temperature (C): 41
		Highest Temperature (C): 45
		Lowest Temperature (C): 24
	Power On Time:  3 days 17 hours 
	Power On Hours: 89.00
	MaxLBA: 4882956287
	Native MaxLBA: 4882956287
	Logical Sector Size (B): 4096
	Physical Sector Size (B): 4096

And hdparm -I /dev/sdX confirms:

*** excerpted ***

ATA device, with non-removable media
	Model Number:       WDC WD201KFGX-68BKJN0                   
	Serial Number:      REDACTEDSERIAL            
	Firmware Revision:  83.00A83
	Transport:          Serial, ATA8-AST, SATA 1.0a, SATA II Extensions, SATA Rev 2.5, SATA Rev 2.6, SATA Rev 3.0
Standards:
	Supported: 12 11 10 9 8 7 6 5 
	Likely used: 12
Configuration:
	Logical		max	current
	cylinders	16383	16383
	heads		16	16
	sectors/track	63	63
	--
	CHS current addressable sectors:    16514064
	LBA    user addressable sectors:   268435455
	LBA48  user addressable sectors:  4882956288
	Logical  Sector size:                  4096 bytes [ Supported: 2048 256 ]
	Physical Sector size:                  4096 bytes
	device size with M = 1024*1024:    19074048 MBytes
	device size with M = 1000*1000:    20000588 MBytes (20000 GB)
	cache/buffer size  = unknown
	Form Factor: 3.5 inch
	Nominal Media Rotation Rate: 7200

Success! Let me know if this worked for you, and what model of hard drive it worked on.

Footnotes

Footnotes
1 Based on 8.4 W maximum power draw of ST8000NM0206 and 5 W idle power, according to Seagate’s spec sheet.
2 Based on 6.9 W “read/write” average, compared to 3.8 W when idle but loaded, according to WD’s spec sheet.

Adventures with single-drive backup to LTO tape using open source tools

I got a Tandberg LTO-6 drive off eBay recently as a way to have an offline, air-gapped third backup of data that normally lives on my NAS or backup storage server.

Although my NAS is already backed up daily to a ZFS pool on another server, all of these systems are networked—and therefore, vulnerable to ransomware, malware, sloppy sysadmin commands on the terminal, and even electric-surge-caused hardware malfunction. And although I do back up some data to cloud storage, not all data is worth the recurring monthly charges of S3/Glacier/Backblaze B2. Besides, playing with hardware is fun.

Magnetic tape, which can store as much as 2.5 TB uncompressed (in LTO-6, the generation I started with) or 12 TB uncompressed (in LTO-8, the current generation as of mid-2021), is a time-tested option that fits in perfectly.

Veeam Backup & Replication Community Edition works well with standalone tape drives. However, it’s a proprietary system that uses Microsoft Tape Format for the on-tape format—a format that is very challenging to recover yourself without using proprietary tools. Moreover, the tape backup mechanism in Community Edition (i.e., without using licensed NAS backup features) is not meant for backing up large volumes of general purpose files—it’s really designed for archiving VM backups from disk.

LTFS also works. However, my initial attempts to use it were foiled by a Microsemi HBA that doesn’t support TLR. Also, if you don’t use proprietary tape software, LTFS can actually perform more slowly for a bunch of reasons (e.g., multithreaded copying, large number of small files, etc.).

When using a Linux desktop, way more options are available using decades-old software that was designed for tape from the get-go.

Remember tar (tape archive)?

Turns out: tar is as usable in 2021 for tape as it was thirty years ago.

Piping a sorted list of filenames into tar

find 'Folder/' -type f | sort | tar -cvf /dev/nst0 --no-recursion -T -

Getting checksums before tar

find 'Folder/' -type f -print0 | sort -z | xargs -0 sha256sum | tee Folder.20210812.sha256sum

You can use sha256sum directly with a glob spec of files, but find will recurse through directories.

Buffering tar with mbuffer

tar --label="archive-name" -b512 -cvf - | sudo mbuffer -m 8G -P 80 -s 262144 -o /dev/nst0

tar -b512 sets the blocking factor to 512 so that each tar record matches the 262144-byte block size of the tape drive (512 × 512 = 262144).

mbuffer -P 80 tries to fill the buffer to 80% before starting to write out.

mbuffer -s 262144 matches the 262144-byte block size.

Verifying the contents of the tape archive

tar -tvf /dev/nst0

This only reads through the end of the file. You need to advance to the next file to read through another tape archive.

Advancing the tape

mt -f /dev/nst0 status
mt -f /dev/nst0 fsf 1
mt -f /dev/nst0 bsf
mt -f /dev/nst0 rewind
mt -f /dev/nst0 eject

Enabling hardware encryption (drive dependent)

This Tandberg drive seems to have the same guts as an HP LTO-6 drive. 256-bit encryption keys can be generated and loaded, but these drives require an extra flag (-a 1). The convenience advantage of enabling hardware encryption is that we can stream from tar directly to tape and back, and the encryption is all transparent to the applications.

stenc -g 256 -k keyfile.key -kd "optional key description"
stenc -f /dev/nst0 -e on -a 1 --ckod --protect -k keyfile.key
stenc -f /dev/nst0 --detail
stenc -f /dev/nst0 -e off -a 1

Bonus: Encoding a barcode into cartridge memory (aka LTO-CM or MAM) using IBM ITDT

The barcode is set in the RFID memory chip and is assigned attribute number 0806. HPE’s LTFS utilities can encode it as part of the LTFS format process, but I figured out how to do this when not using LTFS.

Every attribute is preceded by a 5-byte attribute header, which contains:

  • 2 bytes: the attribute number itself (hex 08 06)
  • 2 bytes: format—apparently ASCII (hex 01 00)
  • 1 byte: length—this has to be 32 decimal (hex 20)

The remaining 32 bytes should be padded with spaces. An example 37-byte binary file, when dumped using xxd (hexadecimal representation on the left, ASCII on the right) should look like this:

$ xxd 0806.bin
00000000: 0806 0100 2046 4a4b 3637 304c 3620 2020  .... FJK670L6
00000010: 2020 2020 2020 2020 2020 2020 2020 2020
00000020: 2020 2020 20

We can try to read the attribute from the cartridge using ITDT:

.\itdt.exe -f \\.\tape0 readattr -p 0 -a 0806 -d 0806.bin

And we can try to encode it to the cartridge using ITDT:

.\itdt.exe -f \\.\tape0 writeattr -p 0 -a 0806 -s 0806.bin

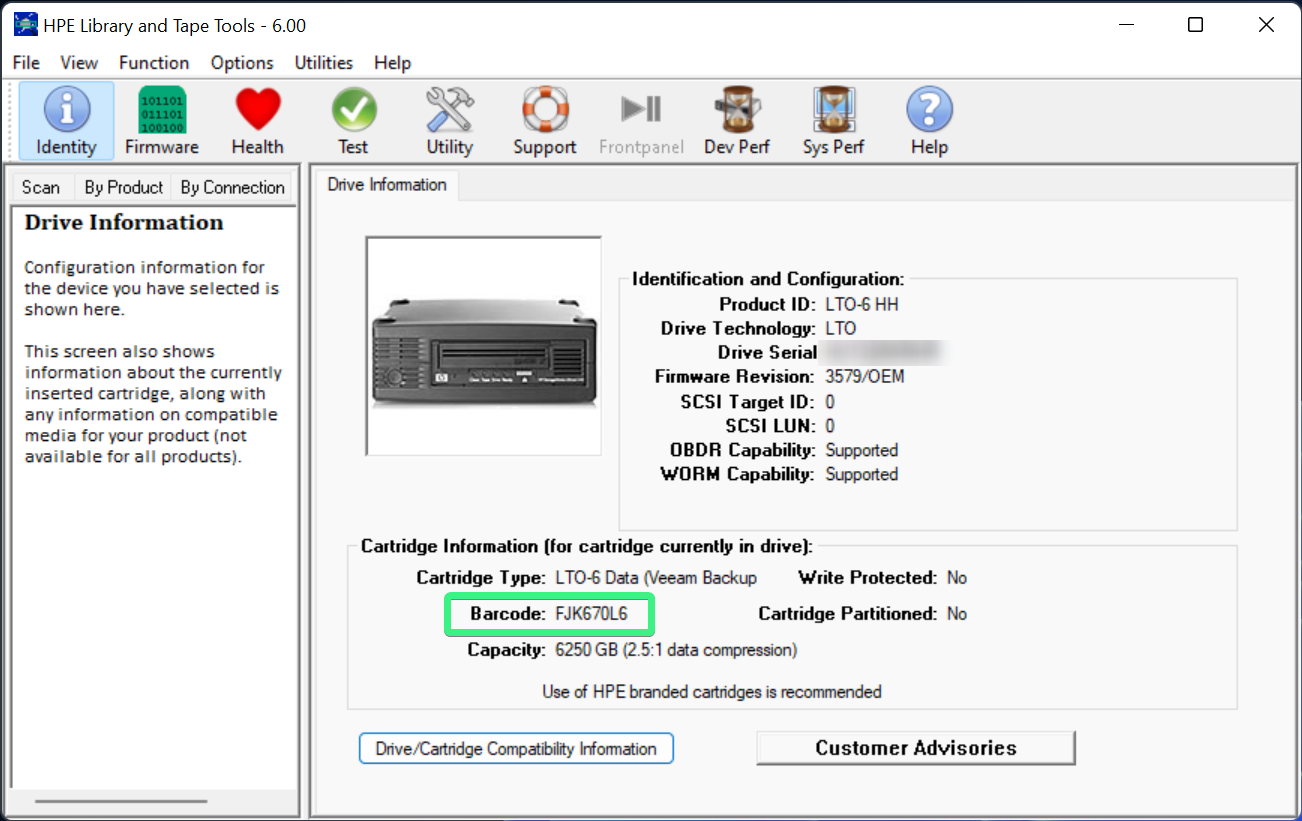
Here’s the evidence that the barcode was properly encoded:

Screenshot of HPE Library and Tape Tools showing barcode field

Appendix: Source Code

These are backups of the open source programs used above, providing some assurance that even if these programs end up disappearing from Linux distributions’ package repositories, I will still be able to access the data stored on these tapes. (There’s probably nothing to worry about here; it’s more likely LTO-6 drives will be EOL long before tar and mt-st disappear.)

Removing useless Windows 10 preinstalled apps

Based on https://community.spiceworks.com/topic/1408834-removing-windows-10-apps-gpo, with the additional refinement of a filter that removes only Store apps and not system apps or frameworks, using PowerShell:

1. List the apps that would be uninstalled.

The -AllUsers flag requires an elevated PowerShell run on an administrator account. Omit the -AllUsers flag if running as a nonadministrator for the current user.

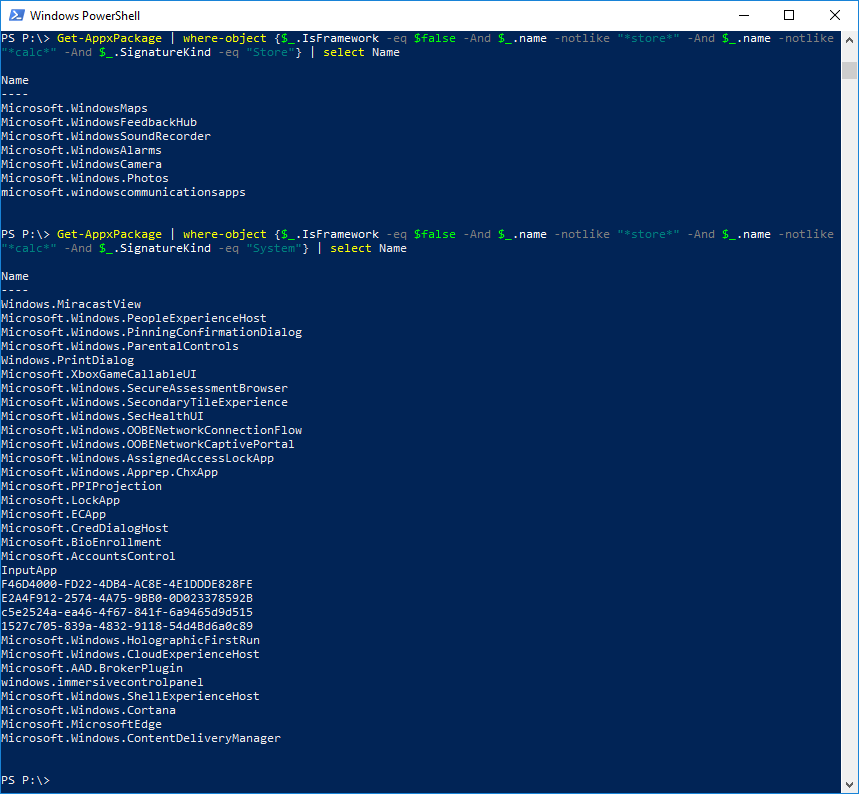
Get-AppxPackage -AllUsers | where-object {$_.IsFramework -eq $false -And $_.name -notlike "*store*" -And $_.name -notlike "*calc*" -And $_.SignatureKind -eq "Store"} | select Name

On a 1711 newly installed VM, this resulted in this list:

Name
----
Microsoft.MicrosoftOfficeHub
Microsoft.Microsoft3DViewer
Microsoft.ZuneVideo
Microsoft.WindowsMaps
Microsoft.WindowsFeedbackHub
Microsoft.BingWeather
Microsoft.Messaging
Microsoft.MicrosoftStickyNotes
Microsoft.XboxIdentityProvider
Microsoft.XboxSpeechToTextOverlay
Microsoft.Print3D
Microsoft.GetHelp
Microsoft.WindowsSoundRecorder
Microsoft.Getstarted
Microsoft.WindowsCamera
Microsoft.3DBuilder
Microsoft.Xbox.TCUI
Microsoft.People
Microsoft.RemoteDesktop
Microsoft.XboxGameOverlay
Microsoft.Office.Sway
Microsoft.Windows.Photos
Microsoft.MSPaint
Microsoft.SkypeApp
Microsoft.XboxApp
Microsoft.DesktopAppInstaller
Microsoft.WindowsAlarms
Microsoft.OneConnect
Microsoft.Wallet
Microsoft.ZuneMusic
Microsoft.Office.OneNote
microsoft.windowscommunicationsapps
Microsoft.MicrosoftSolitaireCollection

2. Actually uninstall them.

Get-AppxPackage -AllUsers | where-object {$_.IsFramework -eq $false -And $_.name -notlike "*store*" -And $_.name -notlike "*calc*" -And $_.SignatureKind -eq "Store"} | Remove-AppxPackage

Certain apps that cannot be uninstalled might be listed in the output.

Microsoft derps on Excel ad

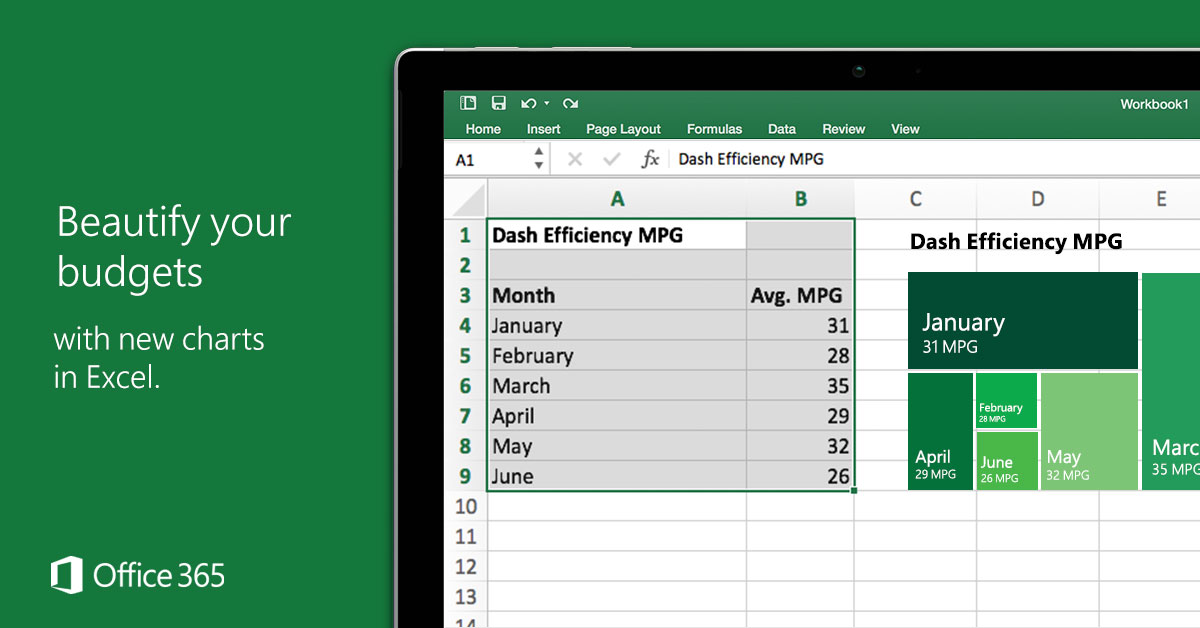
Original resolution of Excel ad showing treemap chart

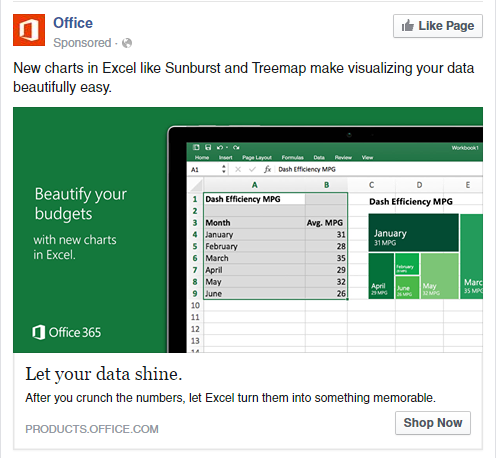
Microsoft’s Facebook ad for new features in Excel highlights the Treemap visualization, but gets it totally wrong.

Ad for Excel visualization features

A treemap is supposed to visualize relative size in a hierarchy. But in the illustration here, the data don’t fit this type of visualization (it’s a time series of one flat variable—without hierarchy).

Original resolution of Excel ad showing treemap chart

But it’s even worse than that. The relative sizes don’t make sense! Why would the 31 MPG box for January be so much larger than the 32 MPG box for May?

This seems like a great illustration of why math/statistical education should be required for everyone—even visual designers and marketers. Or at least, the people selling the product should understand what the software actually does.

CRA PDF form validation frustrations

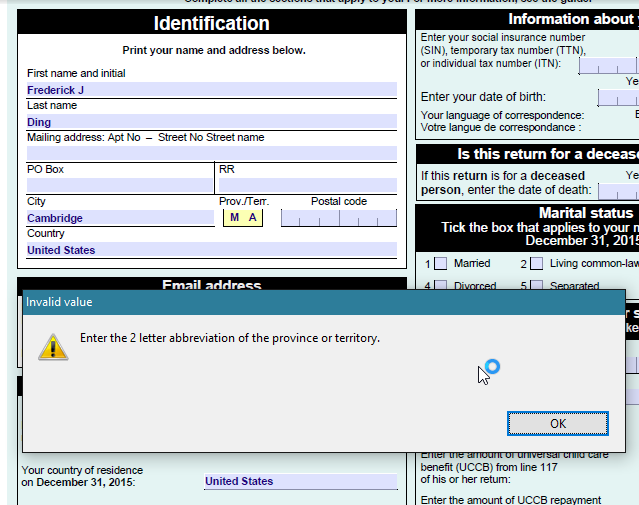
While trying to file my Canadian taxes as a nonresident, using the “Income Tax and Benefit Return for Non-residents … of Canada” — since I live in the United States and am a tax resident of the United States — I ran into a really frustrating bug in the first 5 form fields.

The form doesn’t accept non-Canadian provinces/territories and postal codes!

Can't put Massachusetts as a state
MA? not allowed.

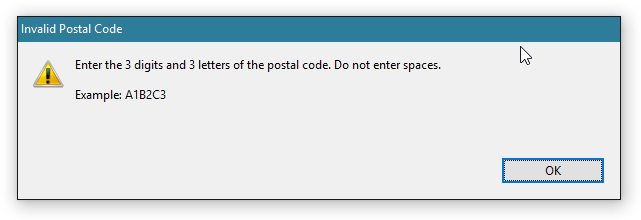
Can't input a ZIP code
ZIP code? not allowed.

It’s really foolish, because many of the people who would be filing this form are likely residing outside of Canada. That’s why this version of the T1 return has an added Country field in the address block.

This is the kind of situation when PDF forms should just step back and allow free-form, unvalidated input.

New fonts in Windows 10

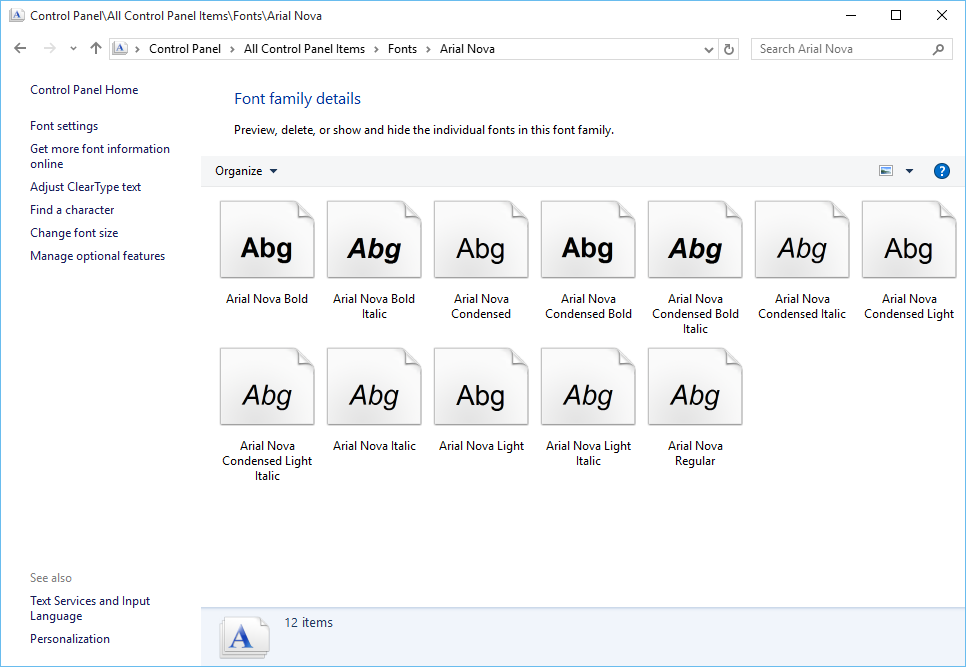
Arial Nova in Windows 10?

Did anybody else notice this?

Update: Rockwell Nova also.

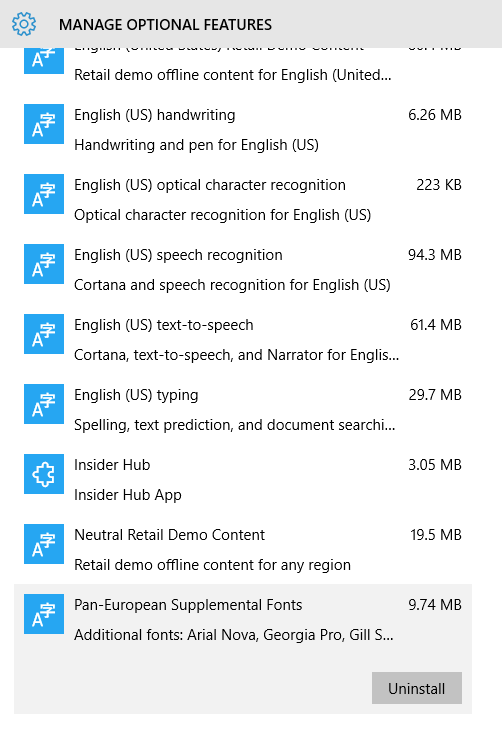
They’re hidden away in the optional features (“Pan-European Supplemental Fonts”), but easily installable from Settings -> System -> Apps & features -> Manage optional features.

Pan-European Supplemental Fonts in Windows 10

Most of these are a refresh on classic Windows fonts like Arial, Georgia, and Verdana, but they should come as a welcome surprise!

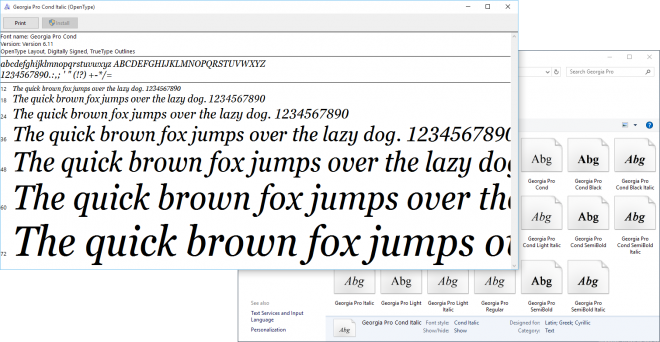
Georgia Pro Condensed Italic

Happy prerelease testing!

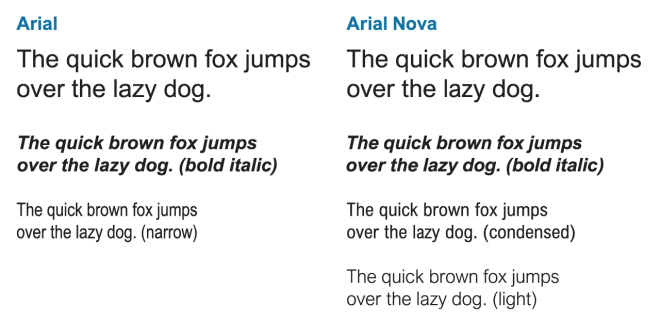
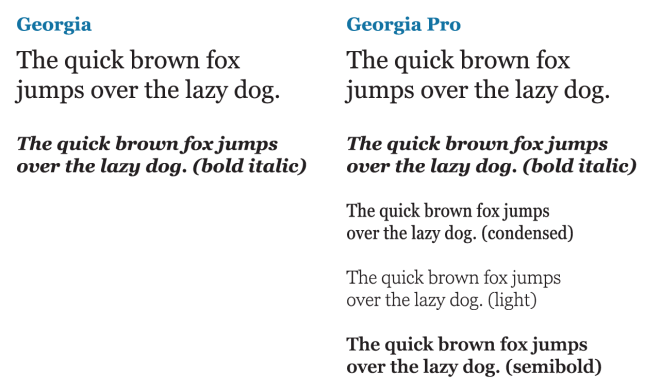
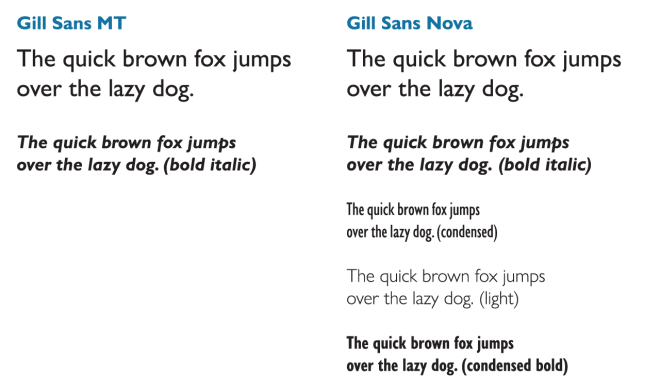
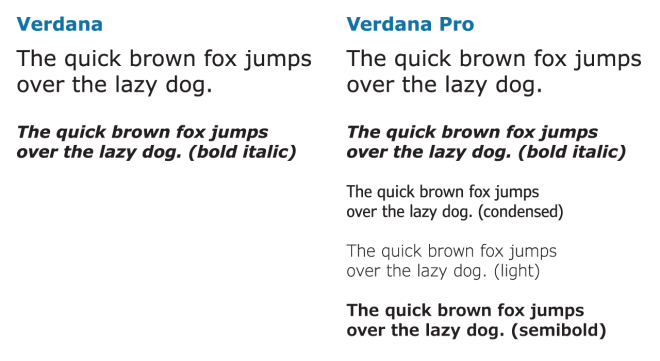
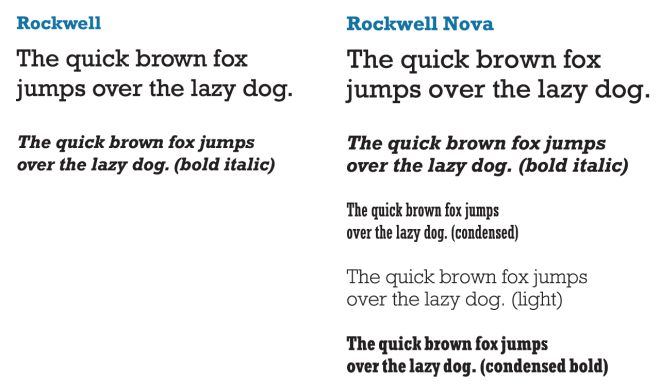
Update: upon request, here are side-by-side comparisons of the new fonts. A subset of available weights/variants is shown in each case. Note that, in most cases, the “Pro” versions add new variants (e.g. Condensed, Light, Semibold, etc) but do not differ significantly in the Regular/Bold/Italic/Bold Italic weights from their ancestors.

Arial vs. Arial Nova

Georgia vs. Georgia Pro

Gill Sans MT vs. Gill Sans Nova

Verdana vs. Verdana Pro

Rockwell vs. Rockwell Nova
Rockwell vs. Rockwell Nova; in this case, the Nova font also has different metrics

Arial vs. Neue Haas Grotesk Text Pro

Using OpenStack images on XenServer – Fedora 22, CentOS 7

For a long time, I’ve been using kickstart scripts (link to GitHub repo) to set up Fedora and CentOS virtual machines on a XenServer host. In the last year or so, the trend of cloud computing has led distributions to release prebuilt “cloud” images in OpenStack-compatible qcow2 or raw disk format, which happen to be broadly compatible with hypervisors. Fedora Cloud’s introduction with F21 prompted me to look into ways of using cloud-init/cloud-config without an entire private cloud infrastructure.

It should no longer be necessary to use a kickstart to install a new VM, because the distribution’s prebuilt images easily work on XenServer with a few conversions.

(Kickstart scripts remain useful for customizing an image, of course; they are often the mechanism with which Linux distros build such images.)

What are prebuilt images?

When I say “prebuilt images”, I mean VM hard disk files released by the Linux distribution. For instance, Fedora 22’s Cloud Base and Atomic Host images are provided in qcow2 and xz’d raw files:
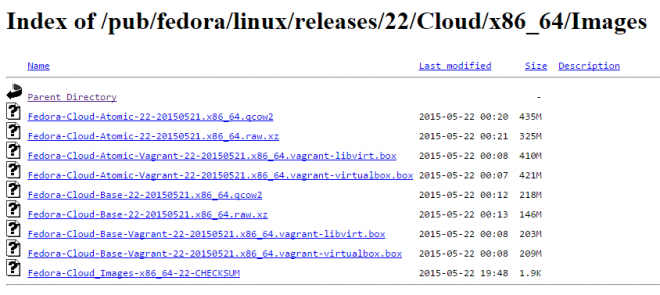
Fedora 22 Cloud Base and Atomic Host images

These releases are designed to work in actual cloud infrastructure—meaning a compute hypervisor (usually KVM), a metadata service that supplies configuration like hostname and networking at boot time, and some APIs that can programmatically affect the virtual machine’s behaviour and configuration. OpenStack is the leading example.

But OpenStack is overkill when you’re just virtualizing a handful of VMs. You don’t need a private cloud when you’re not running a cluster or spinning up machines programmatically. That’s exactly why I found myself running XenServer.

Nonetheless, unless you’re using Xen full paravirtualization (which there are now good reasons to avoid), these images should broadly work with all major hypervisors: QEMU-KVM, VirtualBox, Xen PVHVM, VMware, etc… with minor format tweaks.

How to convert a prebuilt image for use in XenServer

Broadly, there are three steps in the process, the first of which is most important:

  1. Convert qcow2 disk image to VHD.
  2. Import VHD in XenCenter.
  3. Customize imported machine and convert to template.

You can optionally also export the template to an XVA file.

1. Convert qcow2 to VHD

The qemu-img utility can do this. Use your package manager of choice to install (e.g. yum install qemu-img or dnf install qemu-img on F22+). You should do this on another Linux machine (even a VM is okay), because messing with the Xen dom0 is not recommended.

Locate your downloaded *.qcow2 file, which might look something like Fedora-Cloud-Base-22-20150521.x86_64.qcow2. If it’s compressed, like CentOS-Atomic-Host-7.1.2-GenericCloud.qcow2.xz, decompress it first.

Use the command $ qemu-img convert -f qcow2 -O vpc [input file] [output file] to do the conversion. For example,

$ qemu-img convert -f qcow2 -O vpc Fedora-Cloud-Base-22-20150521.x86_64.qcow2 Fedora-Cloud-Base-22-20150521.x86_64.vhd

2. Import the new VHD

If you have XenCenter installed on Windows, use the File -> Import… option to load the VHD. Follow the prompts to set up the VM’s CPU, memory, storage, and networking allocations.

Manual import on command line

Ugh, not using the UI? That means a whole lot more work to import. Are you sure about this???

If you do not have access to XenCenter, it’s a more involved process.

Transfer the newly converted disk image to the hypervisor dom0, such as by copying it into a shared storage location (e.g. NFS image library), and you should be able to use xe vdi-import to load the VHD:

First, get the size of the disk image with $ qemu-img info [VHD file]. Note the size in bytes.

$ qemu-img info Fedora-Cloud-Base-22-20150521.x86_64.vhd
image: Fedora-Cloud-Base-22-20150521.x86_64.vhd
file format: vpc
virtual size: 3.0G (3221471232 bytes)
disk size: 516M
cluster_size: 2097152

Create a VDI in XenServer using the command line tool to hold this new data:

# set SIZE to size in bytes, e.g.
$ SIZE=3221471232
# set SR to the UUID of a storage repository in which to store the VDI
$ SR=$(xe sr-list name-label='NFS virtual disk storage' --minimal)
$ UUID=$(xe vdi-create name-label=Fedora-Cloud-Base-22-20150521.x86_64 virtual-size=$SIZE sr-uuid=$SR type=user)

Then load the VHD:

$ xe vdi-import uuid=$UUID filename=Fedora-Cloud-Base-22-20150521.x86_64.vhd format=vhd --progress

If all has gone well, you get output to the effect of

[|] ######################################################> (100% ETA 00:00:00) 
Total time: 00:00:24

You can check that it’s there by doing

$ xe vdi-list uuid=$UUID

It’s time to make a VM (important: must be PVHVM) to which to attach this VHD. You’ll need to create the CD drive, set up networking, etc, all on the command line. The CD drive should be installed with a cloud-init/cloud-config datasource(Aren’t you regretting not using the GUI now?)

$ VM=$(xe vm-install new-name-label=Fedora-Cloud-Base-22-20150521 template='Other install media')
# make an optical drive, which you might need for cloud-init
$ xe vm-cd-add cd-name='cloud-init-example.iso' vm=$VM device=3

# get the list of networks and their UUIDs; select one
$ xe network-list
# the following line is an example
$ xe vif-create network-uuid=b4187ad6-916e-d1d4-90a7-2b7f1353bca2 vm-uuid=$VM device=0

Now, create the virtual block device (VBD) that associates the VHD disk image with the VM.

$ VBD=$(xe vbd-create vm-uuid=$VM device=0 vdi-uuid=$UUID bootable=true mode=RW type=Disk)


The VM is now ready (although you’ll need to adjust CPU and RAM, which is outside the scope of this guide), either to be booted or to be stored as a template!

3. Customize and convert to template

I like to convert the now-ready VM to a template before using it for anything. This makes it a lot easier to deploy from this point onward. It’s also helpful to tweak the default CPU/memory parameters if desired.

When it’s ready, you can select a halted VM, and choose VM -> Convert to Template… in XenCenter. The equivalent for the xe CLI is something I haven’t figured out yet; the process might require taking a snapshot, and copying the snapshot to become a template.